Showing posts with label sissy bar. Show all posts

Saturday, March 24, 2012

the happenings

Well things have been moving right along at a snails pace as usual, but making miles inch by inch non the less.


Got a look inside the bottom end of the shovel due to a leaky cam cover gasket that I figured needed fixing before I tried running full fluids. Things looked good there.


That creepy guy in my air cleaner is back, but I got the backing plate modified to fit the s&s Super E and it looks pretty Boss.


Got my sissy tower back from Brian, all shining like a national guitar. Lovin' it.

And Hambone's got his chop dropped off for wiring. This is the first picture that really shows the stance of this bad ass machine and shit if it isn't the coolest thing runnin (even though it's not yet).

Sunday, February 26, 2012

ghetto p-pad

I've been on the look-out for a real narrow/skinny sissy-bar pad preferably in distressed leather. After a few weeks of looking all I'd come up with was fat, overpriced old vinyl pieces of shit. So time for a little DIY home-ec.


Step 1: Cut a piece of ply-wood the shape you'd like the pad to be (preferably matches the lines of the sissy bar). Then plaster it with the old Elmers Carpenter's glue. (Note* Be sure not to eat any glue in the process no matter how tempting.)

Step 2: Borrow some stuff from your wife's sewing room while she's not looking and cut out some le3ather from an old weathered leather jacket from the thrift store or basement. Make one equal size to the plywood and the other the same shape, but an inch and a quarter larger all around. Glue the one of equal size to the prepared surface (sticky side) of the plywood.

Step 3: Cut out a piece of foam from your least favorite camping roll. (Note: Just one layer. Remember the goal is not to actually make this thing comfortable. God forbid she actually wants to ride back there all the time. Besides the goal is skinny and narrow).

Step 4: Assembly. begin folding the edges of the larger piece of leather over the back of the plywood and fasten them down with old screws that you salvaged from some other project that never worked out. See I told you you'd want hose someday.

Step 5: To really finish it off pull two or three of those buttony thingy's off of the roof liner of your van and tack them down to give it that pillowy look.

And BAM! you're done!! A custom sissy bar pad built just the way you want it.

Monday, January 16, 2012

Wednesday, January 4, 2012

More better sissy bar.

Check this one out. I dig it. Matches the new bars a lot better


- Posted using BlogPress from my iPhone

Friday, December 9, 2011

Sissy bar in the works

Should be about chest height. Hopefully it doesn't cost me an arm and a leg to get it chromed.


And a sweet aluminum tig weld I did.

Monday, September 19, 2011

Not a sissy fail

Hey Kip your sissy bar is finished.


Posted using BlogPress from my iPhone

Tuesday, July 12, 2011

Epic Sissy Adventure

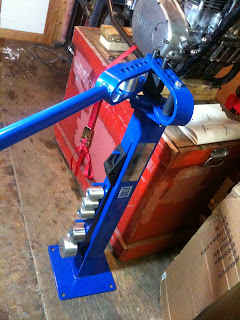
Du Keeps is going on a road trip this week. Billy and I will catch up with him this weekend in Medora, ND. He needed a sissy bar to strap his shit to, but didn't like the look of any of the stock or aftermarket oober-modern ones out there. I said, grab some 1/2" Stainless and com'on by the garage we'll whip one up in the bender that fits just right.

Now, the bender I've got is lag bolted to the floor of the shed, a wooden shed, one layer plywood and one press board. I know, I know, but I've never had a problem bending 1/2" stainless and have done lots o sissys with it. Du Keeps shows up with 5/8" stainless cuz he's gotta be different or some shit. Ok, I say. We'll give it a go. Well two of us pushin and a little MAPP gas heat we made the first curve. Hmm a little twist, but we'll work that out later. We're about to go into the third bend when the Princess Auto Special bender lag bolts lift through the plywood. Ballz.

Now we've got choices. Finishing the 5/8 stainless sissy with a MAPP gas torch and brute force didn't seem like a good way to spend $50 worth of steel. Sooo let's tear up the floor, brace, the bender with 2x4's underneath and get back to work. Yip upgrades to the TGRS. Noowwww, where's that whiskey?


Unfortunately, once we had the plywood floor out of the way and a hole cut in the sub-floor, to slide 2x4 braces into, we discovered that the ground was right there and that we would be required to dig enough dirt out to fit the 2x4's in.

At his point I began to seriously reconsider the re-installation of the bender in the Tiny Garage (which had always been a real pain in the ass to have in an 8X12 workspace anyway)

But wait. With the floor ripped up, a hole in the sub-floor, the bender leaning against the wall and half my fucking shed on the lawn...Du Keeps still needed a sissy bar.

It was at this point that I realized an award was needed for the most epic fucking sissy bar fail ever! and so...

I present the first winner of the 2011 Sissy Award to Du Keeps. I stamped the award name and "DU" into the chrome of a classically awful "Live to Ride" piece of shit so it'll rust like a mule award should. Ride with pride, Buddy.

And you other Mules, beware, because this award is transferable and may be awarded to one of you in the future. Unless Du Keeps just falls in love with the look of a soaring eagle sissy bar and decides to keep it.
Thanks for comin by there Keeps it was an epic evening. See you on the road!

Saturday, January 1, 2011

Back aT'er

Got the Sissy for Pommie nearly finished and mounted up. LoOkIN GoOd.


...-re-tacked the seat posts I made in place to better suit the final fender position.

Now onto the tank mounts and exhaust system.

Tuesday, December 21, 2010

Get bent

Bending metal with heat is for suckers.

Saturday, January 9, 2010

Size Does MAtter

Started fabricating some bits and bobs for the 650 today. Started by making a proper sized sissy. This ones about 24" from the fender about 36" all up.

Also started a headlight bracket. Many other brackets and mounting tabs to go, but it's a start.

Sunday, December 6, 2009

Blacksmith'n Sissy

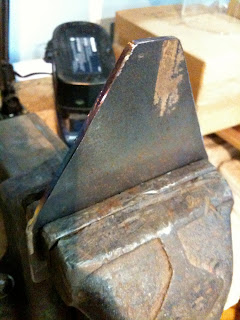
Bangin' out some mounting tabs on the sissy bar today. Heat, Hit, Heat, Hit, Heat, Hit, Heat, Hit, Heat, Hit, Heat, Hit, Heat, Hit, Heat, Hit, Heat, Hit, Heat, Hit. Found an old school article on building sissies and this was the "technique"they described. Worked better than I expected to be honest.Inside surface with hammer marks and edges rounded with bench grinder.


Outside surface flattened from concrete floor I was bashin' against.


Measure twice drill once.

Wednesday, November 25, 2009

Same angle as the...

Taken from Geographical Oddity (blacktopsquadron).